¶ What is Homebrew Builder?
The Homebrew Builder is where you can create certain types of homebrew, all done in 5eTools itself. Currently, the Homebrew Builder is capable of creating:
Before you create any of these, you must select/create which homebrew source you are adding your creations to.
¶ Before You Start
None of the text boxes in the Builder can be used to add JSON to the file. As such, none of the methods of adding headers, lists, tables in the Renderer Demo can be added using the Builder. Text Converter can do so to a degree, but the best way of adding these is through manual conversion.
Also, it is a good idea to familiarize yourself with the contents of the Renderer Demo. It is the reference sheet for all things styling on 5eTools. The tags are equally important as lists and tables.
A happy converter is a converter that saves ofen. A happier converter is a converter that keeps a local backup. You can easily copy the JSON of your creations by going to the right panel’s Data section, or using the Download Creatures/Spells/Legendary Groups as JSON button. Check out the From Zero to Hero article to learn about how to put all your creations together in one file.
¶ Setup Screen
If you are entering the Homebrew Builder for the first time, or haven’t selected a source to be working on before, you will be greeted with the setup screen.
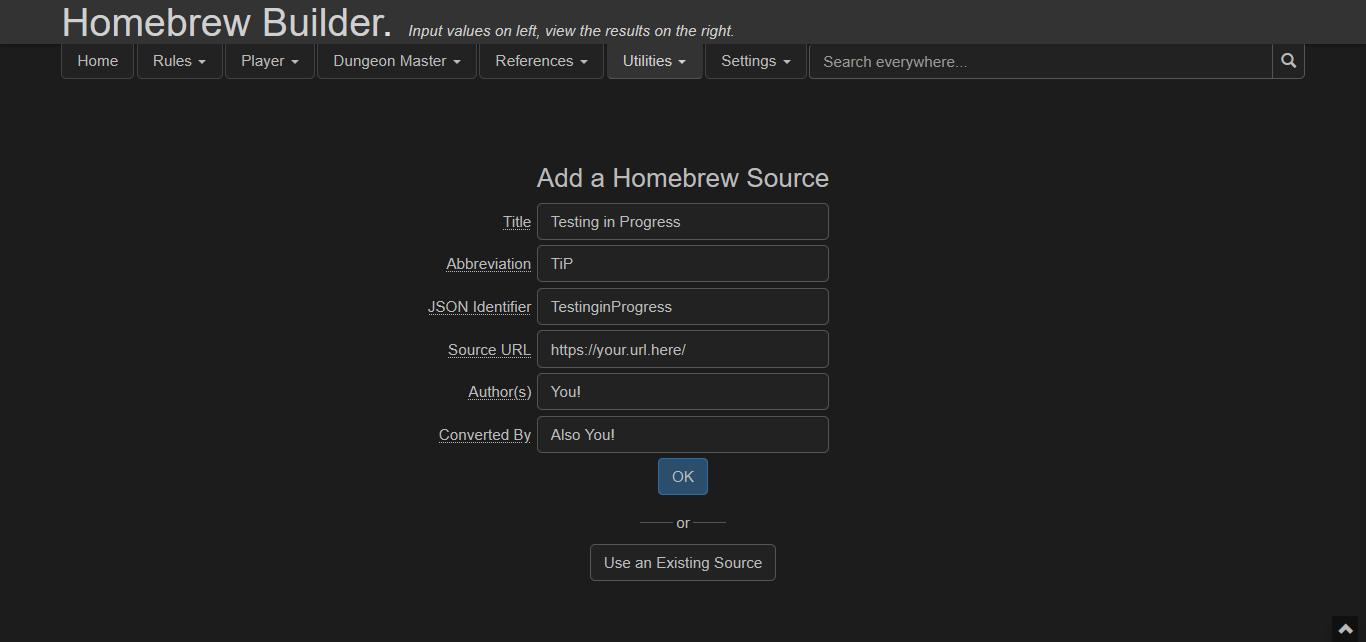
In the ‘Add a new Homebrew Source’ dialogue, you are presented with some fields:
- Title. The name of your homebrew. Anything you like.
- Abbreviation. What your title should be abbreviated as. Similar to how Player’s Handbook is abbreviated to PHB.
- JSON Identifier. A unique string that can be used to identify this homebrew source by 5eTools. By default, it is the title of the homebrew, but without spaces. You can still manually override it.
This should not be the same as any of the default data’s abbreviations, or else 5eTools gets confused.
- Source URL. Should someone wants to take a look, where your homebrew can be found. Any URL will work.
- Author(s). The authors of the source material.
- Converted By. The name of the converter. This should be filled if you are planning on sharing this file on the Homebrew Repo so that if people find errors they can contact the converter.
Clicking OK button will bring you to the Builder itself.
The Use an Existing Source button only appears if you have enabled homebrew in the Homebrew Manager previously.
¶ Builder Interface
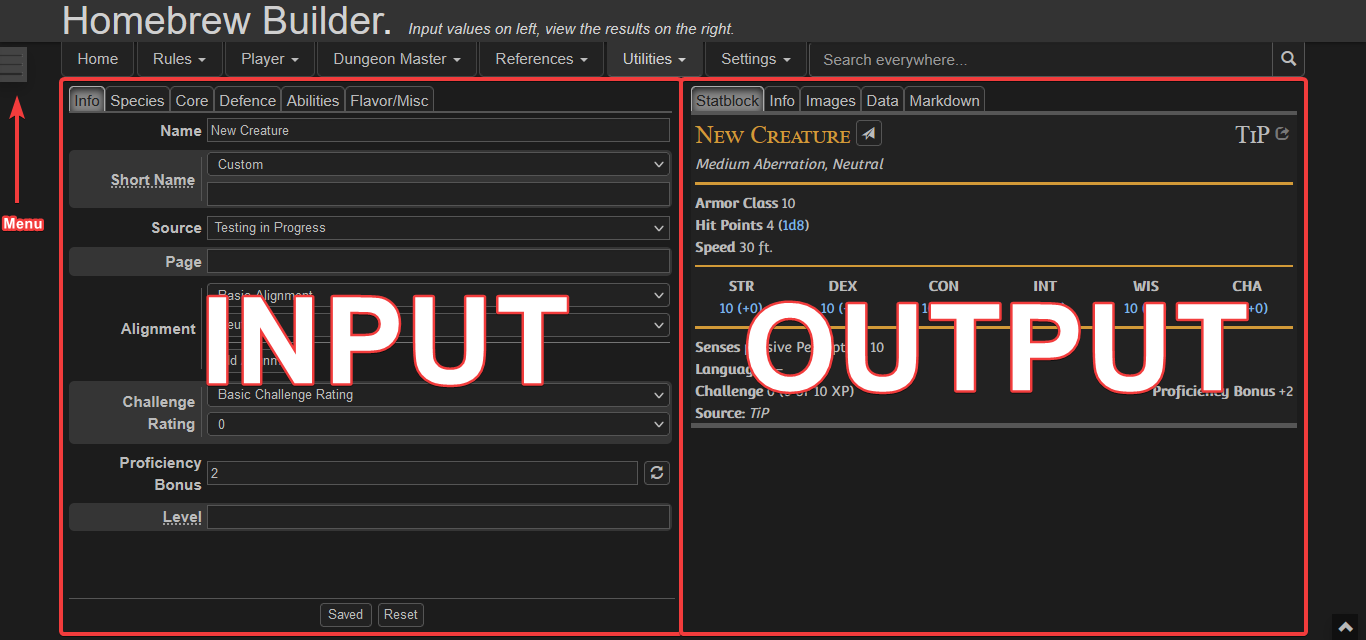
As the page header suggests, the interface of the builder is set up so that you input values on the left, and view the results on the right. You can access the settings menu by clicking the menu button on the top-left.
¶ The Menu
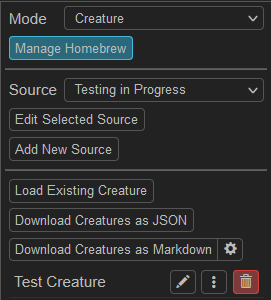
Depending on what mode you are in, the menu is slightly different. But the image above is a good example of what it looks like. We will go over each functionality:
- The mode selector allows you to choose between creatures, spells and legendary groups. Don’t forget to save your current creation before switching modes. For converting anything else, see the Getting Started page.
- Manage Homebrew button brings up a simpler Homebrew Manager for instant access.
- The source selector changes which source you want to save your creations to.
- Edit Selected Source button allows you to change the initial setup parameters for the selected source. You cannot change the JSON identifier, however.
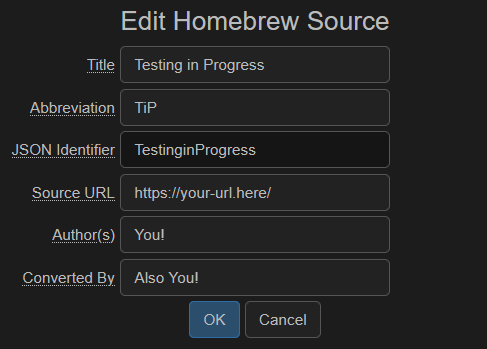
If you really need to change the JSON identifier, you can do so with some manual editing. See the From Zero to Hero section about metadata.
- Add New Source button is used to go back the the initial setup and create a new, fresh source. This does not erase anything you have added to another source.
- Load Existing Creature/Spell/Legendary Group button can be used to quickly pick an existing (default site data or other homebrew) creature/spell/legendary group and use as a base.
- Download Creatures/Spells/Legendary Groups as JSON button can be used to download all of your creations of that type in a single file. This file contains the
"_meta"section, so you can share this file on-the-go.
There isn’t a combined download button, so if you want to create a single file to contain all of your creations, you will have to do some manual slicing and splicing. See the From Zero to Hero article for more info.
- Download Creatures as Markdown button is creature mode specific; it enables the creatures you created to be saved in Markdown format, which, in turn, can be used on sites like Homebrewery or GMBinder. The cog button brings up the following options:
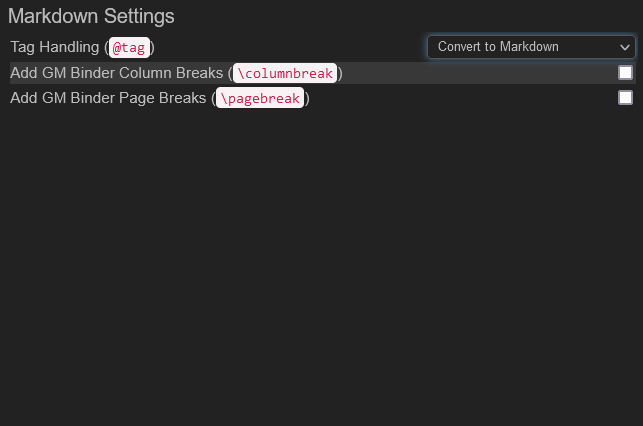
- Tag Handling controls whether you want to change any 5eTools-specific tags your creations have to Markdown, plain text, or leave as-is.
- Add GM Binder Column Breaks and Add GM Binder page breaks boxes, when ticked, periodically add
\columnbreakand\pagebreakto the Markdown output.
- Below, you will find your creations that exist within the current mode.
- If you click the pen, you can start editing the selected creation.
- In the 3 dotted button, you will find options to duplicate the entry, and view or download JSON/Markdown data.
- The red trash can deletes the creation.
¶ Left Panel
This is where you edit the data of your creations. Each mode has several tabs (which we will cover in a moment) for different parts of the creation.
This is also where you save your creation or expunge it. If you are not happy with your current creation, you can press the Reset button to wipe the slate clean. If you are happy with your creation, to work on another you must save your current one and click the Reset button.
¶ Right Panel
This is where your creations are rendered with all the data you provided. There are several tabs for the creation itself, its fluff and images, data for JSON and Markdown. Not all modes have fluff/image buttons, however.
¶ Creating Creatures
After selecting the Creature mode in the menu, you are ready to create a creature! On the left side of the builder, there are six tabs: Info, Species, Core, Defence, Abilities, and Flavor/Misc. There are many fields and buttons to interact, so feel free to experiment, but there are some tips and warnings to heed:
¶ Info Tab
- The Short Name field will be used by Legendary Actions section of the creature, but only if you leave the legendary action header text as default. Otherwise, it has no effect.
- If you are using different alignment options, you might want to consider Custom Alignment option.
- If you want to tweak how much a monster will give but don’t want to change CR, use the Custom Challenge Rating option. If you do so, don’t forget to check on Proficiency Bonus field, if set to auto-update, it might error out with a
NaN. Toggling off the auto-update and giving it a value fixes it.
¶ Species Tab
- Adding tags to a creature’s type is a good way of keeping up with a humanoid creature’s race. Especially useful on NPCs.
- Senses and Languages are free string fields, but they recognize some stuff that’s written on them. For example, if you write
Abyssal but cannot be heard from further than 10 feet.the builder will give the filter tag"AB"to the creature automatically to indicate this monster knows Abyssal.
¶ Defence Tab
- Armor Class fields accept item tags to indicate where the Armor Class value comes from, but you need to select Armor Class From… option. Alternatively, you can use the Special option and get a completely freeform field.
- Damage vulnerabilities, damage resistances, damage immunities and condition immunities all support groups and child groups, with post- and pre-note support.
¶ Abilities Tab
- In the Spellcasting section, you can edit the spells to add notes to each spell. For example, if your creature can cast fireball but it deals necrotic damage, you can add the spell, and click the pen button to change the entry to
{@spell fireball} (deals necrotic damage)Note that this change is not carried over via BetterR20 or Plutonium. - In the Traits section, you can add predefined trait from other monsters for your use. They actually use your creatures stats in certain places too. Do not forget to change the name of the trait as well, they can carry the name of the creature the trait was taken from.
- In the Actions section, the Generate Attack button can be used to create attacks that comply with 5eTools tags and VTT importer settings.
- Legendary Action, Mythic action and Variant sections, while it can be done to a certain degree, are not advised to be utilized on the site due to Builder’s inability to parse JSON into the creature’s statblock. As such, many of the entry stylings from Text Converter cannot be inserted. Manual conversion for those fields is highly advised.
¶ Flavor/Misc. Tab
- Token and fluff image links must be direct links.
- Any environments ticked on for the creature will add filters for that creature for use in the Bestiary page.
- Groups are, well, groups that arbitrarily bind creatures to a single searchable entity. For example, if there exists a homebrew for all the Eevolutions of Eevee, they would have the group
"Eevolutions". - You can also add sound clips for creatures with names that are difficult to pronounce.
- You can mark your creature as NPC or Familiar to exclude or include them from certain filters.
- Search Aliases work as you would expect; search for one name and get another. For example, Mind Flayers have the alias Illithid.
¶ Creating Spells
After selecting the Spell mode in the menu, you are ready to create a spell! On the left side of the builder, there are four tabs: Info, Details, Sources,and Flavor/Misc. There are many fields and buttons to interact, so feel free to experiment, but there are some tips and warnings to heed:
¶ Info Tab
- Subschools for a given spell can be added. For example, you can create Divination (far-sight) subschool for your spell.
¶ Details Tab
- Spells can have multiple casting times. You can add another casting time with the Add Casting Time button.
- Similarly, spells can have multiple durations. Clicking the Add Duration button in the Duration section will add another casting time to the spell.
- Main body of the spell text is also added here. But, as with all Builder creations, you cannot utilize different entry methods. You need manual conversion (or the Text Converter, but this still only works for some styling).
¶ Sources Tab
- Each spell has classes, subclasses, races and background they are tied to, so this tab is all about tying spells to the previously mentioned things. Note that the site (and by extension, Builder) is very picky about capitalization and source names, so make sure the names of sources are properly capitalized and the sources are correct.
- There is also a Generate Additional button. This generates additional sources where those can be derived from existing ones (for example, Eldritch Knight Fighter for a Wizard spell).
¶ Flavor/Misc. Tab
- Like monsters here you can add text and image fluff.
- Additionally, the long list of tickboxes in this tab enables filtering for your spell on the spells page. It covers Inflicted Damage, Condtions, Saving Throws and Ability Checks. It also tags areas types and other miscellaneous properties such as “Summoning Creatues” or “Uses Bonus Action”
¶ Creating Legendary Groups
Most barren of the Homebrew Builder tabs, this section is for adding Lair Actions, Mythic Encounter info and Regional Effects for creatures. It has the Info, Lair Actions, Regional Effects, and Mythic Encounter tabs.
Lair Actions, Mythic Encounter, and Regional Effects are typically lists, and since the Builder cannot add lists, it is not advised to be used for new conversions. It’s main appeal is editing existing legendary group info without going to the source file.