¶ Introduction
This wiki page will guide you from a position of no knowledge (“zero”) into a capable converter with all the knowledge of where to read more (“hero”). It’ll start with a description of the JSON filetype—how 5eTools stores its data—and continue through the process of converting, testing, and sharing your homebrew. Along the way you’ll be pointed towards other dedicated wiki pages or resources, which might contain specific information or help you in your quest. If you have a background in programming, you might be able to skip some sections with a little reverse-engineering, but, even if not, once you’ve understood the fundamentals you’ll have everything you need.
Don’t be put off prematurely! We’ll be going slowly and covering absolutely everything you could possibly need. Here’s what we’ll be working through.
- How JSON works: learn the fundamentals of the JSON filetype, how to write and edit them, and how to test them.
- Defining metadata: start by describing the homebrew source itself.
- Converting your homebrew: turn those statblocks into JSON!
- Testing your file: make sure your JSON is valid and follows 5eTools’ specification.
- Sharing your file: learn how to add your file to 5eTools’ shared homebrew repository.
¶ How JSON works
JSON (JavaScript Object Notation) is a simple, lightweight, text-based filetype. It’s used by 5eTools to store data in a consistent, computer-readable format. If you’re familiar with programming, you can think of JSON as a big hash table.
Here’s a simple JSON as an example, representing (part of) a creature:
{
  "name": "Psionic Half-Djinni Wereflamingo",
  "source": "YourBrew",
  "speed": {
    "walk": 25,
    "fly": {
      "number": 50,
      "condition": "while in bird form"
    },
    "canHover": true
  },
  "resist": [
  	"lightning",
    "psychic"
  ]
}
Let’s break it down piece by piece.
- Most JSON files, and every 5eTools JSON file, begin and end with curly brackets (
{and}respectively). Curly brackets are used to denote objects, so here it’s just saying that the entire file represents a single object. - Objects can have properties. Each property is listed as a series of comma-separated key-value pairs, like this:
"propertyName": <value>. In our example above, our object hasname,source,speed, andresistpropeties. - There are six different types of value:
- Strings are basically just text. A computer knows a value is a string when it’s surrounded by double-quote marks, like
"this". The value of thenameproperty in our example above is a string. - Numbers can be either integers like
18(like in thewalkproperty above) or a floating-point number such as2.71828(not used very often in 5eTools). Numbers are represented by plain digits and an optional decimal point. - A boolean is a binary value: either
trueorfalse. A boolean needs to be written exactly as that word in lower-case. In our example, thecanHoverproperty is a boolean, and set totrue. - You can think of arrays like a list of zero or more values. The list starts and ends with square brackets (
[and]respectively), and contains a comma-separated list of other values (including other arrays!). Theresistproperty in our example contains a list of two strings, for instance. - A property’s value can also be another object! This allows for data to be ‘nested’ in a structured manner. For example, our creature’s
speedcan’t be represented by a single number, so we use an object withwalk,fly, andcanHoverproperties to describe it. Theflyspeed, though, has aconditionas well as a purenumber, so we also need another object to represent all of that information. - The last type of value is
null, which represents the lack of a value at all. You won’t need it very much for 5eTools.
- Strings are basically just text. A computer knows a value is a string when it’s surrounded by double-quote marks, like
- As mentioned, JSON separates its elements with commas (
,), so the computer knows where each thing starts and ends. Take a look above and try to notice how the commas separate one property’s value from the next property’s name, and also how the values inresist’s array are separated likewise. Missing or superfluous commas are the #1 reason JSON files fail validation, so it pays to understand it now! - This example has spread the JSON onto several lines, using indentation to group properties in the same object. This is for human benefit only—the computer doesn’t care! Similarly, the order of object properties doesn’t matter—they’re just labels on the same thing—but you might find it useful to follow a similar order to the statblock. (Note: the order of array values often does matter.)
Although it’s made of very simple building blocks, JSON can be used to make very complex things. If you’d like to learn more about it, we recommend the guides over at Learn X in Y Minutes and W3Schools.
¶ Preferred editors
You can write JSON on any piece of software that can create a plain text file (e.g. Notepad, but not Microsoft Word). However, you can do much better with a dedicated ‘code editor’. Here’s some recommendations:
- Visual Studio Code by Microsoft (VSCode for short) is the most-used editor in the community and has some extensions that make editing JSON specifically for 5eTools much easier. VSCode also supports automatic schema validation, which helps keep you on the straight-and-narrow as you write. You can demo it at https://vscode.dev/
- VSCodium is a fork of VSCode that offers the exact same features but with all Microsoft telemetry and tracking removed.
- Notepad++ by Don Ho is a very lightweight and easy-to-use code editor with a lot of optional customisability. Although not as feature-rich as VSCode, it is quick and simple, and offers some extra functionality through its plugins.
All of the above editors include helpful features we haven’t listed for brevity, and there are many other editors out there with similar functionality. If you’re curious, do take a look for other options—the best editor is the one you are most comfortable with!
¶ Testing your JSON
As you’re working through your file, you might find it useful to make sure you’re on the right track.
Some editors will do this automatically for you. For instance, here’s how VSCode highlights an error:
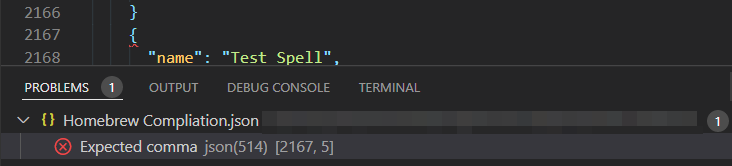
Here, the problematic location is highlighted in the text with a red squiggly underline, and, in the Problems tab underneath, the line (2167) and column number (5) points you to it if you’re looking elsewhere.
If you’re not using an editor with such capabilities, we recommend pasting your JSON into JSONLint. The error messages are written more technically, but should make sense if you go through it slowly and systematically.
As a last resort, 5eTools itself will give you an error message if you try to feed it invalid JSON, although it’ll be typically easier to test your file elsewhere.

Remember to start slowly! As you become more familiar, you’ll make fewer errors and need to check your work less.
¶ Defining metadata
All 5eTools homebrew files require a _meta property, whose value describes the file itself. This is important so 5eTools knows where data comes from, how it’s organised, and how it interacts with any other data! As such, defining your source’s metadata is always the first step in converting homebrew.
For a full description of the _meta property and a basic template you can copy-paste into your own code, please see the _meta page. It’s very short!
¶ Converting your homebrew
Now we’re armed with an understanding of JSON and a well-defined _meta property, we’re ready to turn those statblocks into data. Have your homebrew book, PDF, or DM’s notebook to hand, and get ready for the real work!
In general, the process is to simply add to the JSON file one statblock at a time. Most of the time, a single statblock will be self-contained as a single object, which allows you to compartmentalise. However, when starting out, you will often find it easier to copy similar data as a template; you can do this by browsing the homebrew repo or viewing the code on 5eTools (hover over the ‘pop-out’ button above a statblock).
This wiki contains dedicated pages for many types of content. Please see the Table of Reference for specific information.
You may also need to reference the homebrew schema. Although it isn’t very human-readable, it is the authoritative specification for what JSON 5eTools understands and accepts. If you plan on converting a lot of homebrew content for 5eTools, it’s useful in the long-term to develop at least a cursory understanding of it.
As you are converting your homebrew, you might want to style your text with basic formatting, links to other data, or special structures such as section headers, lists, tables, and inset boxes. 5eTools can display a wide range of formatting styles, which you can read about in the Renderer Demo (under the Utilities menu), which is a special page that documents all of the text-styling options you can use. It’s quite long but well worth the read for future reference!
Be careful when using
@tagstyling or the special structures (e.g. lists) you see in the Renderer Demo. Erroneous styling can prevent the page from loading and be difficult to troubleshoot in a larger file.
Depending on the type of content you want to convert, you might be able to take some different routes described below. Although these are easy shortcuts for certain content, they all have their limits, so you should be prepared to export a JSON file to manually touch up.
When using the tools below, remember to export a back-up regularly. In rare cases, a mistake can cause all your homebrew data to be purged on page-load. This can be troubleshooted from a JSON file… but not if the data is already lost!
¶ Homebrew Builder
The Homebrew Builder is a GUI-based homebrew creation system included in 5eTools itself, under the Utilities menu. You can use it to intuitively convert the following types of content:
- Creatures
- Legendary groups (how 5eTools represents lair actions and regional effects for ‘legendary’ creatures)
- Spells
The Homebrew Builder is quite comprehensive in terms of data, but it’s limited in text-formatting. For instance, you won’t be able to include lists or tables in a creature’s actions using the Homebrew Builder.
¶ Text Converter
The Text Converter is a powerful tool which takes plaintext or markdown and attempts to convert it into 5e schema homebrew JSON. It is included in 5eTools itself, under the Utilities menu. It currently understands the following types of content:
- Creatures
- Feats
- Items
- Races
- Spells
- Tables
Although the Text Converter can speed up conversion quite substantially in the best case, it is very finicky about its input. An errant linebreak or missing comma might be all it needs to get confused, throw its hands up, and complain. If you’re struggling to get it to work with your source, you might be better served by just doing it manually.
Furthermore, be aware that while the Text Converter tries to tag content properly for 5eTools’ filters, it can only really guess based on recognised patterns and names. Always double-check the output for data that either should or shouldn’t be there.
¶ Quick JSON Examples
If you ever need an example, you can always look at an existing item/race/spell JSON by doing the following:
¶ Testing your file
You can (and should!) test your file as you convert it, and you should obviously also test your file at the end. In any case, this is the general procedure.
A happy converter tests frequently. It’s much easier to find an error among 10 monsters than within a fourty-thousand-line behemoth, and it’s much easier to spot errors when you’re testing regularly. Consider doing a round of testing at defined intervals: every 10 statblocks you convert, after finishing a chapter, after finishing each type of content… whatever works for you!
¶ Schema validation
We’ve already briefly discussed how to verify that your JSON file is valid above, but that’s not all! Your homebrew file doesn’t just need to be valid JSON—that JSON needs to also be structured in a way that 5eTools understands. The process of taking a generally valid JSON file and testing that it’s specifically valid for 5eTools is called ‘schema validation’.
You can validate your JSON against the schema using certain code editors (e.g. VSCode) or the test script. Both are described in more detail here.
Depending on your system’s capabilities, live schema-validation in a code editor can quickly become a slog as your homebrew file grows bigger. The test script will always work, but, if you prefer your editor’s more descriptive error messages, you may wish to split your file into multiple separate ones before recombining it at the end.
¶ Live testing
After you’ve ensured that your JSON is valid and that it passes 5eTools’ schema, you’re ready for a live test!
It’s generally easiest to test rendering and filtering on 5eTools, rather than Plutonium or betteR20. To do so, open the Homebrew Manager and hit the Load from File button!
Although the button is called Load from File, nothing is actually sent across the internet. What the button allows is for the website, as displayed on your own computer, to read the file once and add it to your own browser’s localstorage (where 5eTools stores its data after you first load it).
5eTools will sometimes be able to recognise errors from the outset, in which case a pop-up with that information be shown. If not, then it’s time to check each page to which you’ve added content. For instance, if your file contains creatures and spells, check the bestiary and the spell pages. You should also check each statblock you converted; you can do this easily by filtering to just your homebrew source, selecting the first statblock, and hitting J to go down the list.
Here’s some common problems:
- If a statblock appears completely blank, then it’s likely due to an erroneous
@tag. If you can’t find it in the code, isolate the statblock’sentriesand test each one in the Renderer Demo. - If a statblock doesn’t update when you press J, it’s likely because you have two statblocks with the same
nameandsource. 5eTools tries to uniquely identify everything by itsnameandsource, so, if it’s not a mistake, you’ll need to use your converter’s license to rename some content!
If everything appears to display superficially correctly, you should next test all your content tags, such as @creature and @spell. The easiest way to do this is to open your browser’s console (typically F12) and wave your mouse over all the links. If an error is displayed in the console, then one of the links is broken.
Sometimes 5eTools will display content despite the error. Perhaps you even think the formatting is better this way! However, this doesn’t make the error benign, and it can and will cause problems down the line. If you feel like you’re fighting the schema to get your desired formatting, it’s likely that there’s a better way to do it—remember you can always ask for advice in the #brew conversion channel in the community discord!
To be accepted by 5eTools’ homebrew repo, your file must have zero validation errors.
¶ Sharing your file
You’re done! The file’s finished, and all that’s left is… bureaucracy!
If you want to keep the file entirely private, then you are truly finished. Stop reading and give yourself a pat on the back!
If you want to share the file with others, you might want to learn about the homebrew repo below. If you’d rather just share among people you know, that works perfectly well—just send the file to them and they use the Load from File button too! However, you’ll need to resend the file each time you make an update, as 5eTools only ever reads files (or URLs) once.
¶ The homebrew repo
The ‘homebrew repo’ is a centralised repository of 5eTools-compatible homebrew. It includes both big-name conversions and small, anonymous works. It is entirely open for anyone to read or copy, and it’s where 5eTools draws its default list of homebrew from.
The primary benefit of submitting your homebrew to the repo is that your file will be automatically updated if the schema ever changes. The primary (fairly minor) downside is that contributing requires cursory knowledge of Git.
By adding the
"hidden": trueproperty to your file’s_meta, you can prevent it from being seen from within 5eTools’ Homebrew Manager. However, a person looking through the homebrew repo itself can still find, read, and copy it.
¶ Contributing to the homebrew repo
To add to the homebrew repo, you’ll need to make a pull request (“PR”) against it. Here’s a step-by-step process.
- Sign into GitHub. You can freely register an account if you don’t already have one.
- Navigate to the homebrew repo.
- Click the Fork button at the top-right.

- You should be automatically brought over to your own fork. If not, navigate there yourself.
- Within your fork, navigate to the directory that best summarises your homebrew. For instance, a compilation of monsters would belong in the
creaturedirectory. Thecollectiondirectory is used for sources that contain a wide range of content without any one focus. - Click on the branch drop-down button, write a name for a new branch, and click the Create Branch button.
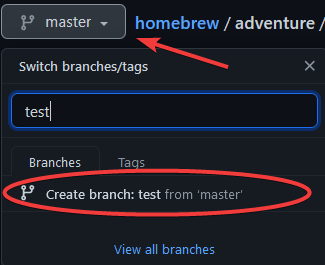
- You will automatically be redirected to this branch. Ensure your file is named in the format
Author Name; Homebrew Name.json, and then drag-and-drop it onto GitHub. You can alternatively use the Add file button at the top-right. - At the bottom, you’ll be presented with a form labeled “Commit Changes”. Fill in the fields as appropriate—the defaults are fine, but you’re welcome to add more information. Before hitting the Commit button, make sure the branch you’re targetting is your new one and not “master” or “main”.
- At the top of your page, you should now see a Compare & pull request button. Hit it!

- Fill out any additional details you wish (the defaults are also often fine). Once you’re finished, click Create Pull Request button.
And that’s it! Within a few minutes, your file will be automatically checked against the schema—you’ll know if there’s a problem because a big, red X-icon will be displayed. If it passes (big, green checkmark!), then a human should approve your pull request within a week or two; this will automatically close your pull request and your file will be added to the homebrew repo.
Before a file can appear within 5eTools’ Homebrew Manager, the homebrew repo’s index must be regenerated. This can sometimes take a day or two extra after your pull request is accepted, so please be patient!
If, after submitting your pull request, you want to make a change to your file, go ahead and do it! As long as you commit the changes before your pull request is accepted, your existing pull request will be automatically updated.
If you want to make a change after your pull request has been accepted, you’ll have to open a new one.
¶ Congratulations!
You’ve made your first homebrew file and (hopefully!) shared it with the world. We hope your homebrew adventures continue in another chapter!